DS18B20 digital thermometer:
The DS18B20 digital thermometer is a neat little thing. It usually comes in a TO92-encapsulation (like a regular transistor), but I've bought a modified version which is more practical for this application, see image below. It is waterproof so I don't have to worry about short-circuits and it's already pre-wired meaning less hazzle connecting it to the control system.

The DS18B20 uses the 1-wire protocol. There is heaps of documentation for it, but the thing that appeals to me is the fact that is is very easy to electrically connect to the system, I don't have to worry about measurement inaccuaracy since the signal is digital, and I can connect several 1-wire sensors to the same input pin on a microcontroller (Raspberry Pi in my case).
Electrical connection:
NB: Do not connect while the Raspberry is powered. It might not ruin anything, but it don't take any chances. In any case it is good practise to power things off before you (dis)connect anything electrical.Despite the name, it actually has three wires. One is for the actual data signal, the two others are electrical ground and power. Note that this is a simplification. To hook it up to the Raspberry Pi, see the below connection diagram.
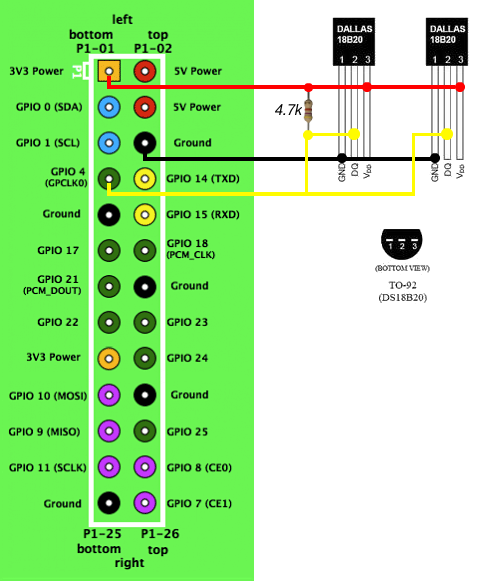 |
| Raspberry Pi GPIO with two 1-wire thermo elements connected |
There are two sensores connected in this diagram, but you can connect as many as you like to the same pins following this layout. Note that you don't have to use GPIO pin 4 of the RPi, any of the green ones will work (and possibly others as well).
That's really all there is to the electrical connection of the thermo elements.
Software coding (using Python):
In a future post I'll describe how to actually read the temperature data on the Raspberry Pi. If you are in a hurry, please see the revered blog at the top of this post.I got the inspiration from this blog, please have a look at it for more on brewing with the Raspberry Pi.
-The Engineer-
Ingen kommentarer:
Legg inn en kommentar